May 16, 2026 · 10 min read
Remove White Background from Image Free (No Photoshop, 2026)
Remove a white background from any image in seconds with a free AI tool — no Photoshop, no signup. Get a clean transparent PNG for ecommerce, logos, and ads.
"Remove white background from image" is one of the most-searched editing tasks of 2026, and for good reason: almost every marketplace listing, slide deck, brochure, and brand asset assumes a transparent or recolored subject sitting cleanly on whatever surface the designer drops it onto. The white studio backdrop you shot against is rarely the background you actually want to publish. This guide covers the fastest free workflow, the edge-quality pitfalls nobody warns you about, and a per-platform export cheat sheet.
The fast answer (3 steps, under a minute)
- Upload your white-background photo to a free AI background remover.
- Let the model isolate the subject — Is it free for commercial use? Yes for in-browser tools like MagicBG see the full FAQ for the licensing rundown.
- Download the transparent PNG and drop it onto any new background.
You can do this end-to-end on the MagicBG home page without an account, an upload, or a watermark. The AI model runs in your browser, so the original photo never leaves your device.
Why "white" backgrounds are sneakier than they look
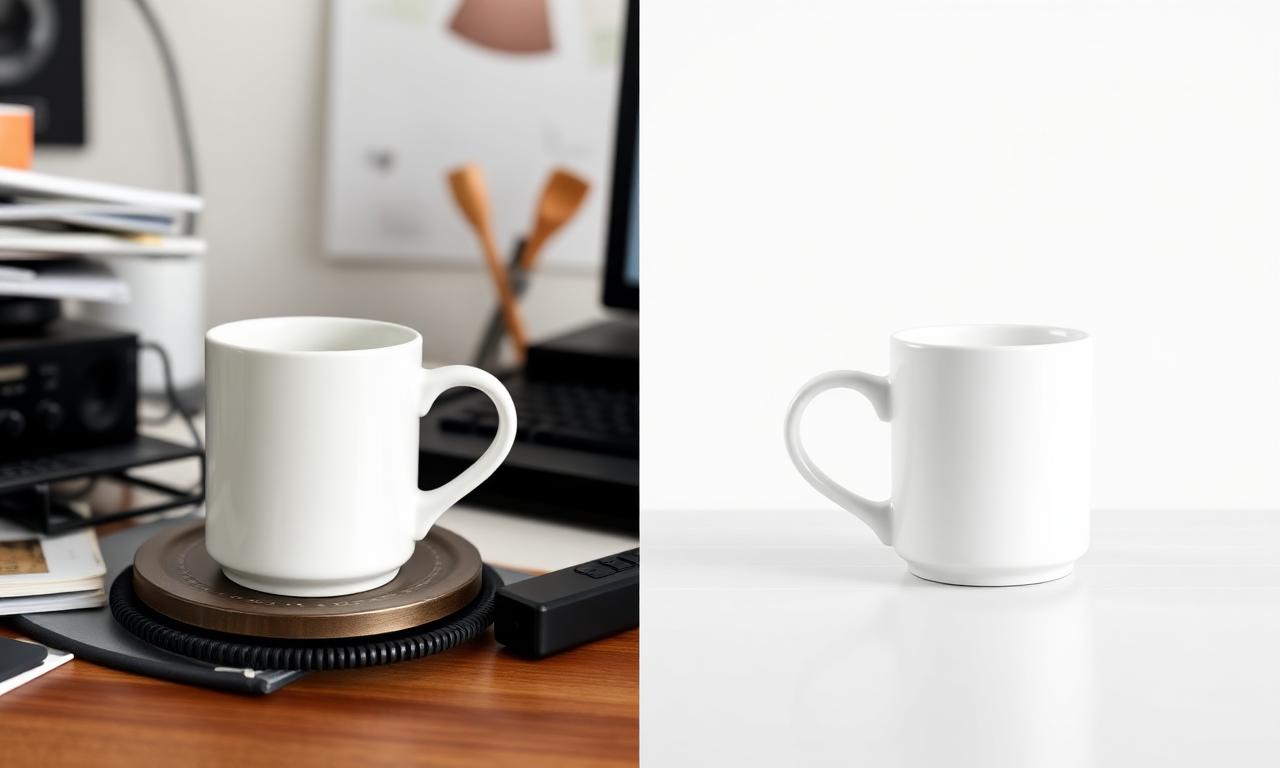
A studio backdrop is almost never pure #FFFFFF. Real white seamless paper falls between #F2F2F2 and #FAFAFA depending on lighting, distance, and white-balance. That tiny gap matters: a naïve "select all white pixels" tool either misses light gray fringes (leaving a halo) or eats into white parts of the subject (a white shirt, a porcelain mug, a milk carton). AI segmentation avoids both because it identifies the subject, not a color.
Manual vs AI: when each makes sense
- AI cutout (recommended for 95% of cases): 5 seconds, works on hair, fur, glass, and white-on-white subjects. Free in-browser tools now match paid desktop apps for quality.
- Photoshop "Select Subject" + refine edge: still the gold standard for hero shots that will be printed billboard-sized. See Adobe's official Select Subject guide. Slow and requires the app.
- Magic wand / color-range: avoid in 2026. Works only on perfect studio shots and always leaves a halo on detailed edges.
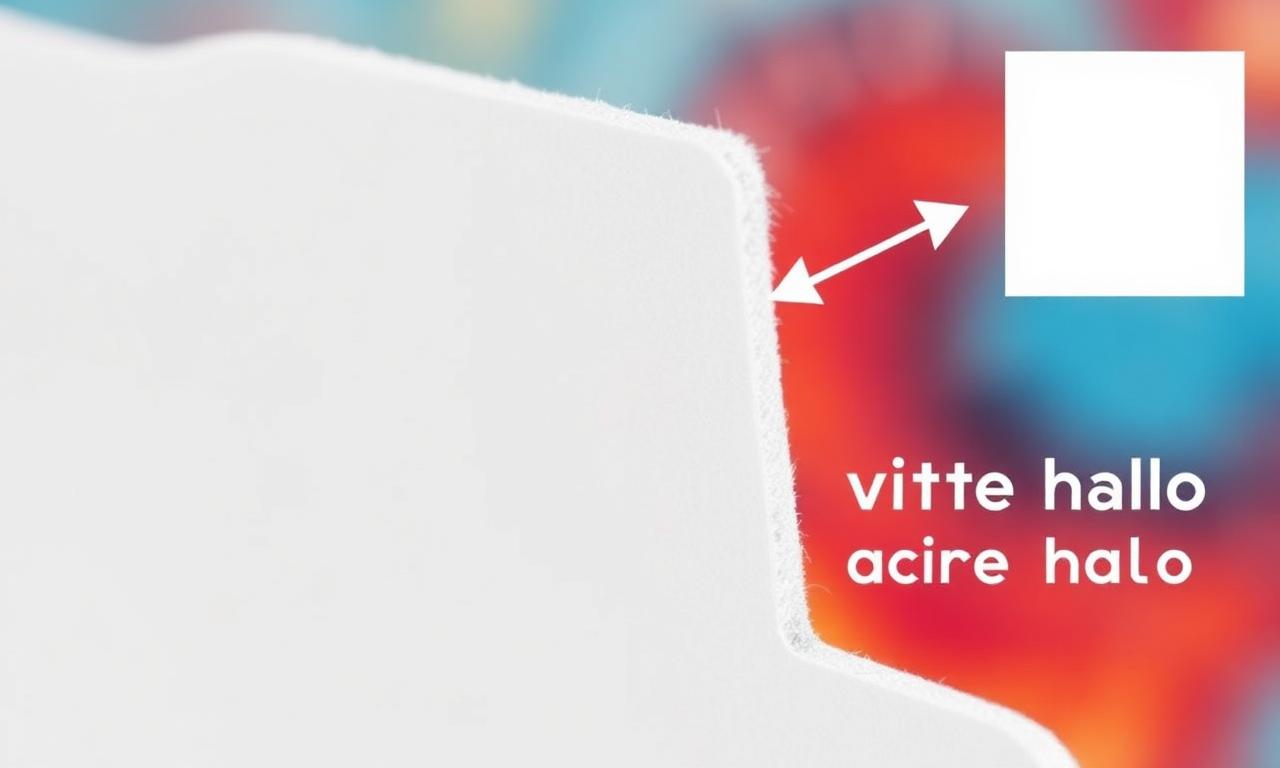
Killing the white halo (the #1 mistake)
The most common complaint after removing a white background is "there's still a thin white outline around my subject". This is called edge fringing or matting. It happens because pixels along the edge are partially transparent and partially white from the original photo. The fix is a single step most tutorials skip:
- In Photopea or Photoshop: Layer → Matting → Defringe (1–2 px).
- In Canva: the Background Remover Pro already includes "edge refinement" — toggle it on.
- In MagicBG: the segmentation model handles defringing automatically on export.
Export cheat sheet by platform
- Amazon main image: JPG, pure white #FFFFFF background (not transparent), 2000×2000, 85% subject fill. See our Amazon listings guide.
- Etsy: PNG transparent works; 2000×2000 minimum.
- Shopify / Squarespace: WebP transparent for fastest page loads. Details in PNG vs WebP.
- TikTok Shop: 1:1 PNG, white or branded color background. See TikTok Shop product photos.
- YouTube thumbnails: PNG cutout on flat brand color, 1280×720. Full workflow in our thumbnails guide.
- Print: PNG at 300 DPI for the final canvas size. Avoid JPG — it bakes in any leftover fringe.
The white-on-white edge case
Shooting a white product on white paper is the hardest case for any tool. Two tricks help:
- Shoot with a faint shadow. A small natural shadow under the subject gives the AI a clean edge to lock onto without harming product clarity.
- Switch backdrops if you can. Light gray (#E5E5E5) or pale blue paper still reads as "white background" to customers but gives the model 10× more contrast on the silhouette.
Bulk removal for catalogs
If you're processing 50+ SKUs, do them in one session: drop each image into the tool, download, repeat. For very large catalogs, a programmatic API is the right call — but for anything under a few hundred images per week, the browser workflow is faster than scripting because there's no setup and no per-image cost.
FAQ: commercial use & licensing
The single question we get most often is whether the cutouts you make here are safe to use in a paying context — paid ads, Amazon listings, client decks, packaging, printed merch. Short answer: yes, on MagicBG it is 100% free for commercial use, with no watermark, no resolution cap, no daily quota, and no signup. The longer answer — and the conditions that matter — is below.
- Is MagicBG really free for commercial use? Yes. There is no paid tier, no "pro" plan, and no usage limit. You can use the exported PNG/WebP on Amazon, Etsy, Shopify, TikTok Shop, Meta and Google Ads, client work, printed packaging, merch, and editorial content without paying anything and without crediting MagicBG.
- Who owns the output image? You do. MagicBG only modifies the alpha channel of the file you drop in — we never see, store, or claim any rights to your photo or the resulting cutout, because the AI runs locally in your browser. Whatever rights you had on the original photo, you still have on the cutout.
- Do I still need rights to the source photo? Yes — this is the one real condition. Removing the background does not give you a license to a photo you don't own. Use photos you shot, photos you commissioned, stock you've licensed, or assets your client has authorized. A random image pulled from Google Images is not yours to publish, cutout or not.
- Are AI-generated cutouts allowed by marketplaces? Yes. Amazon, Etsy, Shopify, and TikTok Shop all allow AI-edited product photos as long as the final image accurately represents the product and meets each platform's image policy (e.g. pure white #FFFFFF main image on Amazon, no logos or watermarks). MagicBG's output is just a cleanly masked version of your photo — no synthetic pixels are added.
- Can I resell the cutouts (templates, mockups, stock packs)? Yes, provided you own or have licensed the source photos. Selling a transparent-PNG product pack made from photos you shot is fine. Reselling cutouts of someone else's copyrighted image is not — that's a source-rights issue, not a MagicBG one.
- Do I have to credit MagicBG? No. Attribution is appreciated but never required.
- What about logos, celebrities, or branded products? Standard IP and publicity-rights rules apply exactly as they would to the original photo. A cutout of a Nike shoe is still a photo of a Nike shoe; removing the background doesn't change what you're allowed to do with the brand.
- Other practical questions: Yes, it works on photos you didn't shoot yourself (subject to the rights point above). Yes, it works on screenshots, UI mockups, and scanned documents. No, you can't "keep the original white background and only remove the edges" — for that, use a layer mask in Photopea instead.
For the broader licensing rundown across every cutout use case, see the full background-removal FAQ.
Bottom line
Removing a white background in 2026 is a five-second task that used to take ten minutes. The combination of in-browser AI + automatic defringing + the right export format per platform is what separates a clean listing from one that looks amateur in the catalog grid. Open the MagicBG home page, drop your photo in, and ship.