June 10, 2026 · 16 min read
How to Change Image Background with AI: Complete Free Guide 2026
Learn how to change image background with AI in 2026 — remove backgrounds and replace them with white, colors, gradients, or scenes. Free, no signup, browser-based guide.
Changing the background of a photo used to require expensive software, advanced skills, and hours of careful masking. In 2026, AI has made it a two-step process that anyone can complete in under a minute: first remove the original background automatically, then place your subject on any new backdrop you want — white, a brand color, a gradient, or even a completely different scene. This guide covers every part of the workflow, from choosing the right source photo to exporting a professional result, entirely with free browser-based tools.
Whether you are an online seller who needs consistent white backgrounds for marketplaces, a content creator building bold social graphics, a job seeker polishing a LinkedIn headshot, or a designer compositing images for marketing campaigns, background replacement is one of the highest-impact edits you can make. The best part is that modern AI segmentation runs locally in your browser, so your photos never leave your device and you do not need a subscription to get started.

Why changing a photo background matters
The background of a photo carries more visual weight than most people realize. A cluttered living room behind a product shot instantly signals amateur work, while a clean white backdrop reads as professional and trustworthy. A plain wall behind a headshot feels forgettable, but a subtle grey gradient adds polish without distraction. The background sets the context, controls the viewer's eye, and determines whether an image feels at home on a corporate website or a personal Instagram feed.
In e-commerce, background consistency is a conversion driver. Amazon, eBay, Etsy, and Shopify all reward listings with clean, uniform product photography because buyers process the product faster when the background does not compete for attention. In social media, a cut-out subject layered over a bold color or pattern stops the scroll far more effectively than a flat photo. In professional contexts, a neutral headshot background signals competence and keeps the focus on your face. Changing the background is not just an aesthetic choice — it is a strategic one.
Understanding the two-stage workflow
Every background replacement follows the same two-stage pipeline, whether you are doing it once or a thousand times. Stage one is separation: the AI must precisely identify which pixels belong to the subject and which belong to the background. This produces an alpha mask — a grayscale map where white means fully opaque subject, black means fully transparent background, and gray values along the edges create smooth anti-aliasing. Stage two is composition: the transparent subject is layered on top of a new background image or color, and the final image is flattened and exported.
The reason this workflow matters is that each stage has its own quality requirements and failure modes. A perfect cutout placed on a poorly chosen background still looks amateur. A mediocre cutout on a beautiful background looks fake because the edges betray the composite. Mastering both stages — getting a clean alpha mask and then making smart compositing choices — is what separates polished results from obvious edits. The rest of this guide walks through each stage in detail, with free tools at every step.
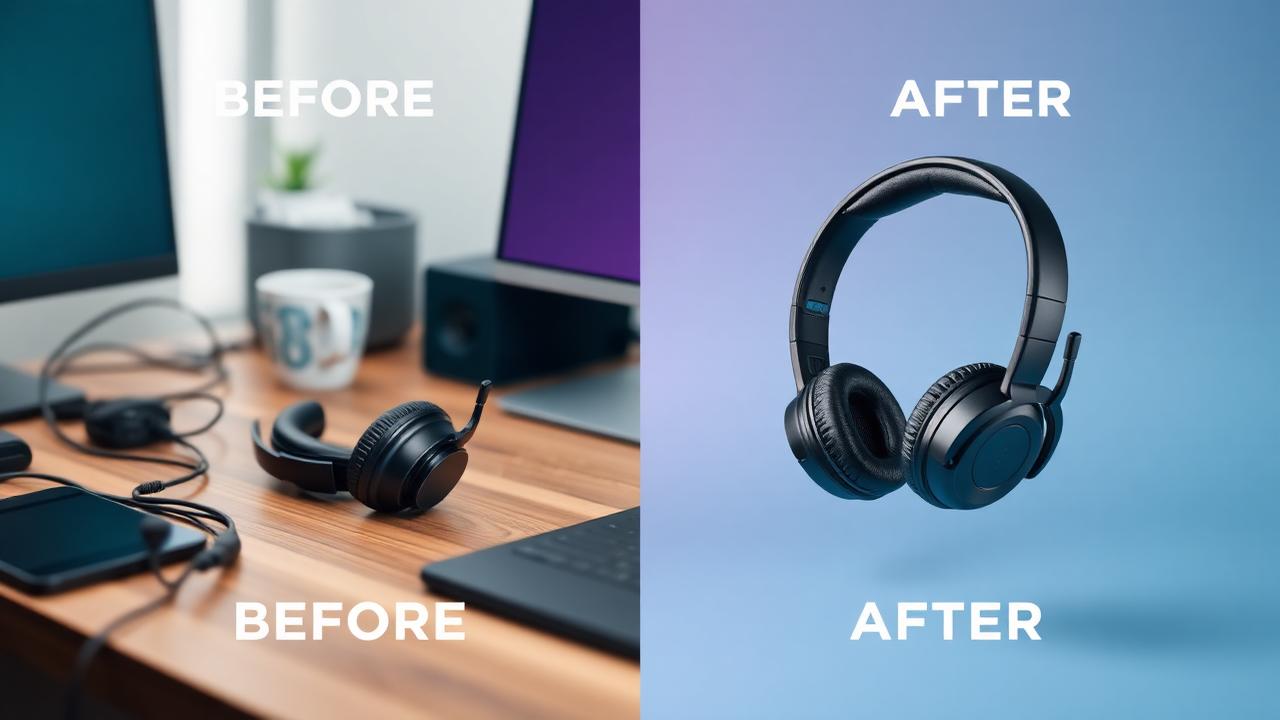
Step 1: Remove the original background with AI
Before you can place your subject on a new background, you need a clean cutout with a transparent alpha channel. In 2026, this step is fully automated. Open MagicBG in any modern browser, drag your image into the upload zone, and the on-device segmentation model isolates your subject in two to four seconds. The AI is trained on millions of labeled images and handles hair, fur, glass, and complex edges with accuracy that rivals manual Photoshop masking.
The technology behind this is semantic image segmentation: a neural network classifies every pixel as either foreground or background, then generates a soft alpha mask that preserves fine detail. Because the model runs locally via WebGPU, there is no upload, no queue, and no server cost to pass on to users. The output is a transparent PNG at the same resolution as your original file. For a deeper technical explanation, see our article on how AI background removal works.
- Upload: Drag any JPG, PNG, or WebP file into the browser tool.
- Process: The AI analyzes the image and creates a precise foreground mask.
- Download: Save the transparent PNG and move on to background replacement.
If the initial cutout has minor flaws — a stray pixel of background or a slightly soft edge — you can usually fix them by starting with a higher-resolution, better-lit photo. The quality of the source image drives roughly 80 percent of the final result. Shoot against a contrasting background, use even lighting, and avoid motion blur for the cleanest possible mask.

Step 2: Replace with a white background for e-commerce
The most common background replacement is pure white, and for good reason. Every major marketplace — Amazon, eBay, Etsy, Walmart, Shopify — recommends or requires a white background for the main product image because it eliminates visual noise and keeps the catalog looking uniform. Amazon's specification is exact: RGB 255, 255, 255, with the product filling at least 85 percent of the frame. A transparent PNG from MagicBG makes this trivial to achieve.
To create a white background, open the transparent PNG in any free image editor — Photopea, GIMP, Canva, or even Paint.NET — and create a new white layer behind your subject. Position the product so it is centered and well-cropped, then flatten and export as a high-quality JPG or WebP. The result looks indistinguishable from a professional studio shot that cost hundreds of dollars to produce. For platform-specific requirements, see our guides for ecommerce product photos, Amazon listings, Etsy, and Shopify.
White is not the only e-commerce standard. Some fashion retailers prefer light grey because it reduces glare on white garments. Cosmetics brands often use soft pink or beige to evoke warmth. The key is consistency: once you pick a background color for your store, apply it to every product image so the catalog feels cohesive and trustworthy.
Step 3: Replace with a solid color or gradient for social media
Social media rewards bold, scroll-stopping visuals. A cut-out subject placed on a vibrant solid color or a smooth gradient draws the eye far more effectively than the original cluttered background. YouTube thumbnails, Instagram carousels, TikTok cover images, and LinkedIn posts all benefit from this technique. The trick is to choose a background color that contrasts with your subject while matching your brand palette.
Solid colors work best when you want maximum simplicity. A product floating on a deep navy background feels premium. A portrait on a bright coral background feels energetic and modern. A headline graphic on a soft lavender background feels calm and approachable. The rule is simple: your subject should be the lightest or darkest element in the frame so it pops against the backdrop.
Gradients add depth without complexity. A subtle top-to-bottom gradient — dark to light, warm to cool, or complementary colors — creates dimension that flat color cannot match. Most free design tools, including Canva and Figma, offer preset gradients that you can drop behind your transparent PNG in one click. For YouTube thumbnails specifically, see our guide on removing backgrounds for YouTube thumbnails.
Background color psychology: what your backdrop communicates
Every color triggers an emotional and cultural response, and the background of your image is the largest single block of color in the frame. Understanding this psychology helps you choose backdrops that reinforce your message rather than working against it. White backgrounds communicate cleanliness, precision, and neutrality — which is why hospitals, tech companies, and e-commerce giants use them so consistently. They strip away context and force the viewer to focus entirely on the subject.
Dark backgrounds — deep navy, charcoal, or black — signal luxury, authority, and sophistication. High-end fashion brands, automotive companies, and premium electronics retailers use dark backdrops because they make products feel expensive and substantial. Warm backgrounds like beige, soft orange, or dusty rose evoke approachability, comfort, and human connection. Health, wellness, and lifestyle brands gravitate toward these tones because they feel inviting rather than clinical. Bright, saturated backgrounds — electric blue, vivid coral, lime green — communicate energy, youth, and urgency. They are perfect for social media graphics, event promotions, and any context where you want to stop a scroll and demand attention.
The most important rule is alignment: your background color should match the emotional goal of the image, not just your personal preference. A funeral services company using neon pink backgrounds would create cognitive dissonance, while a children's party planner using stark grey backgrounds would feel cold and unwelcoming. When in doubt, test two or three background colors with a small audience and measure engagement. The color that generates the most clicks, likes, or conversions is the right one for your specific context.
Step 4: Replace with a photo or scene for creative composites
The most dramatic background replacement is a full scene swap — dropping a portrait onto a beach sunset, placing a product in a lifestyle context, or compositing a headshot into a branded virtual office. This is where the quality of your cutout matters most, because the human eye is extremely sensitive to mismatched lighting, color temperature, and edge softness between the subject and the new background.
To sell the illusion, match the lighting direction and intensity of the subject to the new scene. If your portrait was shot with a soft window light from the left, the background scene should also have its primary light source from the left. Color grading helps too: apply a slight warm or cool tint to the entire composite so both layers feel like they were captured at the same time of day. A tiny bit of Gaussian blur on the background can simulate shallow depth of field and keep the viewer's attention on the subject.
Free tools that handle scene composites well include Photopea (which mimics Photoshop's layer stack), Canva (for quick drag-and-drop placement), and GIMP (for advanced blending and color correction). The workflow is always the same: import your transparent PNG, add the background image as a bottom layer, position and scale both layers, then adjust colors and shadows until the composite looks natural.
Best free tools to change photo backgrounds in 2026
You do not need Photoshop or a paid subscription to change backgrounds professionally. Here are the best free tools for each stage of the workflow, all tested in 2026.
- MagicBG — The best free background remover. Runs entirely in your browser via WebGPU, removes backgrounds in seconds with no watermark, no signup, and no upload. Exports transparent PNG at full resolution. This is your starting point for every background replacement project.
- Canva — Ideal for adding solid colors, gradients, or stock photo backgrounds behind your cutout. Drag the transparent PNG into a design, add a background layer, and export. The free tier handles most social media and presentation use cases.
- Photopea — A free browser-based photo editor that looks and works like Photoshop. Perfect for advanced composites, layer masks, color grading, and shadow creation. Supports PSD files if you need to collaborate with designers.
- Figma — Best for UI/UX and marketing teams who need to place cutouts into mockups, banners, or landing page designs. The free tier is generous and the layer system is intuitive.
- GIMP — A full desktop image editor for Windows, macOS, and Linux. More complex than Canva but offers complete control over alpha channels, layer blending modes, and color correction.
The fastest real-world workflow is usually MagicBG for the cutout, then Canva for the background placement, then export in the format your platform needs. For more advanced work, swap Canva for Photopea or GIMP.
Tips for realistic background replacement
Even with a perfect AI cutout, a background replacement can look fake if the subject and the new backdrop do not share a consistent visual language. Here are the professional tips that separate amateur composites from polished ones.
- Match the lighting direction. If your subject is lit from the right, the background should also have its brightest area on the right. Flipped lighting is one of the fastest ways to break the illusion.
- Match color temperature. A warm, golden-hour portrait looks wrong on a cold, blue-toned office background. Adjust the white balance of either layer until they feel harmonious.
- Add a subtle shadow. A soft drop shadow or contact shadow grounds the subject in the new scene and prevents a floating, cut-out look. Most editors let you add this in one click.
- Match sharpness and grain. A razor-sharp subject on a blurry background, or a noisy subject on a perfectly clean background, feels mismatched. Apply slight blur or noise to unify the look.
- Keep the subject large enough. Do not shrink your cutout so small that it gets lost in the new scene. The subject should typically occupy at least 25 percent of the frame.
- Feather the edges slightly. A 0.5 to 1 pixel feather on the alpha mask softens the transition between subject and background, preventing a harsh cardboard-cutout look. Most editors call this edge refinement or anti-aliasing.
- Use environmental reflections. If your subject is on a glossy surface in the new background, add a faint, flipped reflection beneath them. Even a subtle reflection grounds the subject and makes the composite feel three-dimensional.
Export settings: file formats, resolution, and compression
After you have composed your subject on a new background, the export step determines whether your image looks crisp on a retina display, loads fast on a website, or gets rejected by a marketplace for being the wrong file type. Getting the export settings right is the difference between a professional result and a disappointing one.
For e-commerce and web use, JPG at 85 to 95 percent quality is the safest default. It produces small file sizes that load quickly, and at high quality settings the compression artifacts are invisible to the naked eye. If your platform accepts it, WebP typically delivers the same visual quality at 25 to 35 percent smaller file sizes, which improves page load speed and search engine rankings. PNG is the right choice only when you still need transparency — for example, if you are exporting a cutout to import into another design tool later. PNG files are much larger than equivalent JPGs, so avoid them for final web delivery when the background is already filled.
Resolution matters too. Amazon and most major marketplaces recommend at least 1600 pixels on the longest side, with 2000 by 2000 pixels being the ideal square format for zoom functionality. Social media platforms have their own size requirements: Instagram feed posts are 1080 by 1080 pixels, Instagram Stories are 1080 by 1920, LinkedIn posts prefer 1200 by 627, and YouTube thumbnails should be 1280 by 720. Always design and export at the exact pixel dimensions of your destination platform to avoid automatic cropping or upscaling that degrades quality. If you need transparent images for further editing, see our comparison of PNG vs WebP for transparent images.

Common mistakes when changing image backgrounds
These errors trip up beginners more than any technical limitation. Avoiding them will save you time and produce a more professional result.
- Ignoring edge fringing. After removing a background, a faint halo of the old background color often clings to the subject's outline. Use a defringe or decontaminate-colors tool before placing the subject on a contrasting new background.
- Choosing clashing colors. A neon green background behind a soft pastel product creates visual chaos, not energy. Use a color wheel to pick complementary or analogous colors that work together.
- Over-compressing the final image. Aggressive JPEG compression destroys fine edges and makes the cutout look pixelated. Export at 85 to 95 percent quality, or use WebP for smaller files without visual loss.
- Forgetting platform dimensions. A beautiful composite exported at the wrong aspect ratio gets awkwardly cropped by Instagram, LinkedIn, or YouTube. Always design for the exact pixel dimensions of your destination platform.
- Using low-resolution source photos. AI cannot invent detail that does not exist. A 500-pixel-wide photo will never look crisp on a 2000-pixel canvas. Start with the highest resolution you have.
Popular use cases for background replacement
Background replacement is not a niche skill — it is a daily need across dozens of professions and platforms. Here are the most common use cases where a simple background swap makes a measurable difference.
- E-commerce listings: Place every product on a uniform white or branded background to build catalog consistency and boost conversion rates on Amazon, Etsy, and Shopify.
- Social media content: Create scroll-stopping posts and stories by placing cut-out subjects on bold colors, gradients, or trending patterns.
- YouTube thumbnails: Layer a high-energy face or product over a contrasting background to increase click-through rate. See our dedicated YouTube thumbnail guide.
- Professional headshots: Swap a distracting office or living room for a clean grey or white background that signals competence. Read our headshot background guide for color recommendations.
- Marketing banners: Drop product cutouts into seasonal sale banners, email headers, and landing page hero images with consistent brand backgrounds.
- Presentations: Replace busy photo backgrounds with clean solid colors so the subject supports your slide instead of competing with it. See our guide on presentation background removal.
- Profile pictures: Stand out on LinkedIn, Instagram, Discord, and messaging apps with a subject that pops against a curated background.
- Stickers and memes: A transparent cutout is the raw material for WhatsApp stickers, Telegram stickers, and reaction memes. See our WhatsApp sticker guide.
Scaling up: batch background replacement for teams
When you are managing hundreds or thousands of product photos — for example, launching a new collection on Shopify, updating an entire Amazon catalog, or preparing a conference headshot gallery — changing backgrounds one at a time is impractical. The solution is a batch workflow that applies the same two-stage process to every image without manual intervention.
Start by organizing your source photos into folders by category or destination. Use a consistent naming convention so you can trace each file back to its original. Next, process the entire folder through a background removal tool that supports batch uploads. MagicBG allows you to drag multiple files into the browser at once, and because the AI runs locally, there is no server-side queue or rate limit slowing you down. The output is a folder of transparent PNGs, each named identically to its source file.
For the replacement stage, use an editor with batch or template capabilities. Canva's bulk create feature lets you apply the same background design to dozens of cutouts at once. Photopea's action recorder can automate layer placement, scaling, and export for an entire folder. Even simple command-line tools like ImageMagick can fill a transparent PNG with a solid color across hundreds of files in a single script. The key is to standardize every variable — background color, subject size, canvas dimensions, and export quality — so the final catalog looks like it came from a single professional studio rather than a patchwork of different edits.
Quality control is essential at scale. After batch processing, open a random sample of 10 to 20 images and inspect the edges, color consistency, and framing. If you find systematic issues — for example, a particular product category consistently produces rough edges — adjust your source photo guidelines rather than trying to fix every image individually. Small improvements to lighting, contrast, and camera settings at the capture stage eliminate far more problems than any post-processing fix.
How to change image background FAQ
What is the easiest way to change a photo background?
Remove the background with a free AI tool like MagicBG, download the transparent PNG, then open it in Canva or Photopea and add any new background — white, color, gradient, or photo — behind your subject.
Can I change the background of a photo for free?
Yes. The entire workflow — AI background removal, background replacement, and export — can be done with free browser-based tools. MagicBG removes the background for free with no watermark, and Canva or Photopea let you add new backgrounds at no cost.
What background color should I use for product photos?
Pure white (RGB 255, 255, 255) is the standard for marketplaces like Amazon and eBay. Light grey is popular for fashion to avoid glare on white garments. Choose a color that matches your brand and apply it consistently across your catalog.
How do I make a background replacement look realistic?
Match the lighting direction and color temperature of the subject to the new background. Add a subtle shadow to ground the subject, and make sure sharpness and noise levels are consistent across both layers.
Can I change the background on my phone?
Yes. Open MagicBG in your phone's browser to remove the background, then use Canva's mobile app or Photopea in mobile Safari to place the cutout on a new background.
What file format should I use for a changed background?
Export the final composite as JPG for web and social media when the background is filled. If you need to preserve transparency for further editing, export as PNG. For the smallest file size with transparency, use WebP.
Bottom line
Changing an image background in 2026 is a two-step process that anyone can master, from complete beginners to experienced designers looking to speed up their workflow. First, use a free AI tool like MagicBG to remove the original background and export a transparent PNG in seconds. Second, place that cutout on any new backdrop — white for e-commerce, bold colors for social media, gradients for presentations, or full scenes for creative composites. The only requirements are a sharp source photo, a free browser-based tool, and a few minutes of attention to lighting and color consistency.
The democratization of this technology means that professional-grade image editing is no longer locked behind expensive software subscriptions or years of technical training. A small business owner in Marrakech can produce Amazon-ready product photos that compete with Fortune 500 brands. A freelance graphic designer in Manila can deliver client work in minutes rather than hours. A job seeker in Montreal can turn a casual smartphone photo into a polished LinkedIn headshot. The playing field has never been more level, and the results have never been more accessible.